How To Makeover A Front Door - A Woodubend Tutorial
- Melissa Geskie
- Jun 13, 2021
- 3 min read
Updated: Jul 2, 2023

Let's do a quick flip on my front door! I've had this door issue with holes since I moved in, those two holes were left from a old door knocker or peep hole. I always put a wreath or something over top of them but its time for a makeover!

Here is a good close up shot of the before.....

I didn't want to purchase a new door, seeing they were a couple hundred dollars! I knew I could cover it with something, and make this work. I choose a Woodubend moulding to fit that space perfectly! I wanted to keep the same color scheme, so it matched the outer door. I chose Silk All In one Paint in Anchor. And believe it or not, this quick flip took less than 10 minutes of painting! And it covered in one coat! Let's do this project with three simple products, Woodubend, Silk Paint & a Scarlet Brush!

Before we begin our project let's clean the door and prep properly. I used White Lighting, this is a great cleaning and de glossing agent. Cleaning is a essential part of this makeover! Paint will not adhere well without a proper clean and de-gloss! After I cleaned I used water to rinse it off. I also removed the kick plate that was at the bottom of the door.

Since Silk All In One paint requires a light sand scuff for optimal adhesion I used my Rad pads from Dixie Belle to rough it up. This also helped me remove any loose or flaking paint on the door.
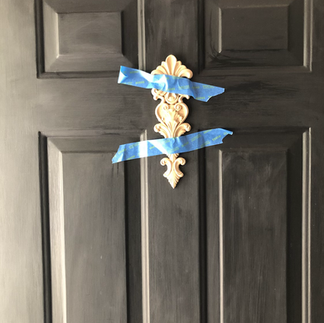
This is Woodubend #x1002. It's a large piece, perfect to fit the space and cover those holes. Woodubend mouldings are amazing due to the fact you can heat them up and bend them around the areas you are working with. They adhere to any surface with wood glue and all you need is a heat gun! I flipped this moulding over and heated it with the gun, this allows it to become soft. I added wood glue to the backing and placed on the door. I used painters tape to cover the moulding and hold it vertical. I then applied more heat to the moulding to make sure it was flat and adhered well. Once you tape it up you are good to paint right over top! Moulding are also stainable, or drilling holes into them is easy!


Next up? Paint! I used my smooth Scarlet brush to apply the Anchor. Silk paint is self leveling and when dry shows no brush strokes. I used one even coat of paint to cover the door. I painted right over that moulding, look at the detail! Silk paint and a Scarlet go together like peanut butter and jelly! Plus that sweet little brush fits perfect into the jar of paint! Need a Silk Paint tutorial? Click here! My door now looks like a upscale custom door! So super fast and easy. Have you tried Woodubend yet?
I put the kick plate back on and it was complete!
Since Silk paint has a built in topcoat there is no need to seal the finished product. I finished painting and walked away! Now my door is refreshed and clean looking. The Woodubend moulding has become one with the door and covered those holes easily. I think I'll be painting a lot more doors in the future! Thanks for joining me on my fast flip makeover!

Want to watch me paint a door live? you can click here to see me use Dixie Belle Chalk Mineral Paint on my side door.
For more fun painting tutorials please come and subscribe to my YouTube!
Happy painting!
Melissa


To makeover a front door, start by choosing stylish and durable entrance doors that enhance your home's curb appeal. Go for custom entrance doors to personalize the design and create a unique look that fits your home’s style. Consider adding a fresh coat of paint, updating hardware, or incorporating decorative elements like glass panels or new trim. With a few thoughtful upgrades, you can transform your front door into an inviting focal point that adds both beauty and value to your home.
Well done. Brief and to the point. Self leveling paint ..... Great Idea!