Shed to Shabby Chic! This Laminate Desk Got a MAJOR Glow-Up (and YOU Can Too!)
- Melissa Geskie
- 21 hours ago
- 5 min read

Okay, spill the tea! How many forgotten treasures are lurking in your shed or garage? For me, it was this poor, dusty laminate desk. Honestly, it had been banished for so long, the reason for its exile was a total mystery... until I tried to move it. Laminate. Ugh. The nemesis of many a furniture flipper!
But fear not, my fellow makeover mavens! Today, we're proving that even the slickest surfaces can be transformed into something absolutely stunning. This desk was screaming for a second chance, and with a little paint magic (and a secret weapon!), we gave it a glamorous new life. Get ready for a makeover that's easier than you think and delivers seriously jaw-dropping results!


The Rescue Mission: Turning Laminate Woes into Wow!
Here's the lowdown on how we took this forgotten laminate desk from drab to dazzling:
What You'll Need (Find all these goodies at www.dixiebellepaint.com):
Your dusty laminate victim (I mean, project!) Save the hardware!
Dixie Belle White Lightning Cleaner: To get that grime GONE.
Dixie Belle Bonding Boss: Our superhero primer for painting ANYTHING!
Dixie Belle Paint (One Solid Color): For your gorgeous ombre base. I chose a beautiful hue that would blend well in Dried Sage! Added shades of Morning Sunrise, Collard Greens & Pink Champagne to blend with the BEST DANG BRUSH!
Belles and Whistles "Favorite Bouquet" Transfer: The star of our show – prepare for floral fabulousness!
Dixie Belle Moonshine Metallic Paint: For those touch-of-glam stripes.
Belles and Whistles "Wildflower" Silkscreen Stencil: For delicate, whimsical details.
Paint brushes (various sizes)
Lint-free cloths
Spray bottle with water (optional, for paint application)
Spray paint in gold for hardware update!
A cute little seat and some faux fur for the ultimate glam reveal!

This Woodubend will cover that hold from a keyhole. Adding Architectural Flair with WoodUbend:
Want to take your makeover to the next level? Consider adding some gorgeous, heat-bendable mouldings from WoodUbend (also available at www.dixiebellepaint.com). These incredible embellishments can add instant character and a touch of elegance to your piece. (unfortunately this exact Woodubend is sold out on the Dixie Belle site!) Here's how easy it is to apply them:
Choose Your WoodUbend: Browse the amazing selection of designs on the Woodubend website and pick the mouldings that speak to your style.
Prep Your Piece: Ensure the area where you'll be applying the WoodUbend is clean and dry (and painted with your base coat if desired).
Heat it Up! This is where the magic happens. You'll need a heat gun (a hairdryer on high heat can also work for smaller pieces, but a heat gun is recommended for best results). Gently heat the back of the WoodUbend moulding until it becomes pliable and flexible. You'll feel it soften. Be careful not to overheat it!
Apply Adhesive: While the WoodUbend is warm and flexible, apply a good quality wood glue to the back of the moulding.
Position and Press: Carefully position the WoodUbend onto your furniture where you want it. Press firmly along the entire length of the moulding, ensuring good contact with the surface. Because it's warm, it will mold slightly to curves and contours!
Secure (If Needed): For intricate or longer pieces, you can use small nails or tape to temporarily hold the WoodUbend in place while the glue dries completely. Remove them once the glue has set.


Let's Get This Makeover Party Started!
Clean Like You Mean It: First things first, let's banish that shed dust! Give your desk a thorough cleaning with Dixie Belle White Lightning. Follow the instructions on the package to ensure a squeaky-clean surface. Rinse well and let it dry completely. This step is crucial for good adhesion!
Bonding Boss to the Rescue! This is the game-changer for laminate! Apply two thin, even coats of Dixie Belle Bonding Boss to all the surfaces you plan to paint. Let it dry completely according to the instructions. This primer creates the perfect "grip" for your paint to adhere beautifully.
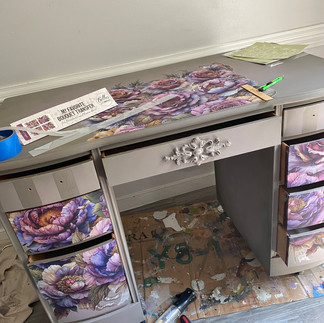
Ombre Dreams: Now for some color! Apply your chosen Dixie Belle Paint in your solid base color. For an ombre effect, on the second coat lay out your color pattern and use the Best Dang Brush to blend them together softly. Need a video? Click here!
Stripes with Sparkle: For a touch of elegance, I added metallic stripes to the top two drawers. Using your Dixie Belle Moonshine Metallic Paint and a smaller brush, carefully paint your stripes. Let them dry completely.
The Main Event: Applying Your Belles and Whistles Transfer Like a Pro! This is where the magic really happens!
Belles and Whistles "Favorite Bouquet" Transfer. Decide on the placement you love. You can cut the transfer into sections if needed for easier application.
Prepare Your Surface: Ensure your painted surface is completely dry and smooth.
Peel and Stick: Gently peel the clear transfer sheet away from the backing paper. The design will stick to the clear sheet.
Position Carefully: Carefully position the sticky side of the transfer sheet onto your furniture. Take your time to get it exactly where you want it!
Smooth it Out: Using your applicator tool (or a credit card), firmly rub over the entire transfer sheet, pressing the design onto the painted surface. Work from the center outwards to avoid air bubbles.
Gentle Release: Once the design is fully adhered, slowly and carefully peel away the clear transfer sheet. If any part of the design sticks to the clear sheet, lay it back down and rub again. Seal with Clear Coat to lock it in!
Dandelion Wishes: For a touch of whimsy, I used the Belles and Whistles "Wildflower" Silkscreen Stencil to add delicate sprigs. Follow the instructions for silkscreen stenciling – it's easier than you think to add these charming details!
The Finishing Touch: I found a cute little seat, tossed a faux fur throw on it, and voilà! Instant glamor! This once-forgotten desk is now a stylish statement piece, all thanks to the power of paint and a little creative vision.


The Takeaway: You CAN Paint That!
See? Even laminate isn't a match for the power of Dixie Belle Bonding Boss and the beauty of Belles and Whistles Transfers. This makeover was surprisingly easy and the results are truly stunning. So, go forth and rescue those forgotten pieces! Unleash your inner artist, embrace the color, and create something magical. You'll be amazed at what a little paint (and a gorgeous transfer!) can do!
Don't forget to check out www.dixiebellepaint.com for all the amazing products used in this transformation and so much more inspiration! Happy painting!
Want 10% off your Woodubend purchase? Use "thetop10" for the discount!
Want to watch a video tutorial of the process? Click here!


Melissa
Follow me on Facebook here! https://m.facebook.com/ThetopdrawerRVA/
Follow me on Instagram here! https://www.instagram.com/thetopdrawerrva/
Follow me on Pinterest here! https://www.pinterest.com/thetopdrawerrva/
***This blog includes affiliate links at no added cost to you! Thank you for supporting small.
Comments